EARM MONEY

Friday, November 12, 2010

Create web browser in c#

This tutorial will teach you how to create a simple web browser. I will be using Microsoft Visual C# 2008 Express Edition.

First, you create a new Windows Form project, and name it whatever you like. The name you give it will become the namespace.


Next, we resize the application window to however wide and however high we want it.


Now, we add in some controls so the user can influence what the program is doing.


Next, we add in a Webbrowser control so the user can view the internet. We also set the default website to http://www.yahoo.com/


Finally, we add in this bit of code to bring it all together:

Code:

//The following are just the using declarations
using System;
using System.Collections.Generic;
using System.ComponentModel;
using System.Data;
using System.Drawing;

using System.Text;
using System.Windows.Forms;
//end of using declarations

namespace Simple_Web_Browser //change to your project name
{
public partial class Form1 : Form
{
public Form1()
{
InitializeComponent();
//sets the default url box(textBox1.Text) to be http://www.yahoo.com/
textBox1.Text = "http://www.yahoo.com/";
}


private void button1_Click(object sender, EventArgs e)
{
//Just checks to see if the url, which contains the value from the url box(textBox1.Text)
//starts with http:// or https:// and if it doesn't, add it

string url = textBox1.Text;

if (!url.StartsWith("http://") &&
!url.StartsWith("https://"))
{
url = "http://" + url;
}

webBrowser1.Navigate(new Uri(url));


}

//Update url Box.
private void webBrowser1_DocumentCompleted(object sender, WebBrowserDocumentCompletedEventArgs e)
{
textBox1.Text = webBrowser1.Url.ToString();
}
//End update url Box


//Uses the hitting of the enter key as the same as clicking the Go! button
private void textBox1_KeyDown(object sender, KeyEventArgs e)
{
if (e.KeyCode == Keys.Enter)
{
string url2 = textBox1.Text;

if (!url2.StartsWith("http://") &&
!url2.StartsWith("https://"))
{
url2 = "http://" + url2;
}

webBrowser1.Navigate(new Uri(url2));
}
}
Create Simple Web Browser In C#

/*
Professional Windows GUI Programming Using C#
by Jay Glynn, Csaba Torok, Richard Conway, Wahid Choudhury,
Zach Greenvoss, Shripad Kulkarni, Neil Whitlow

Publisher: Peer Information
ISBN: 1861007663
*/

using System;
using System.Windows.Forms;
using System.Drawing;
using AxSHDocVw;

public class WebBrowser : Form
{
private AxWebBrowser browser;
private Button goButton;
private TextBox addressBox;
private Panel panel1;
private Panel panel2;

public WebBrowser()
{
panel1 = new Panel();
panel2 = new Panel();
browser = new AxWebBrowser();
browser.BeginInit();

this.SuspendLayout();
panel1.SuspendLayout();
panel2.SuspendLayout();

this.Text = "MyWebBrowser";
panel1.Size = new Size(300, 30);
panel1.Dock = DockStyle.Top;

panel2.Size = new Size(285,240);
panel2.Location = new Point(5, 31);
panel2.Anchor = AnchorStyles.Top | AnchorStyles.Bottom | AnchorStyles.Left | AnchorStyles.Right;

browser.Dock = DockStyle.Fill;

addressBox = new TextBox();
addressBox.Size = new Size(260, 20);
addressBox.Location = new Point(5,5);
addressBox.Anchor = AnchorStyles.Top | AnchorStyles.Right | AnchorStyles.Left;

goButton = new Button();
goButton.Image = Image.FromFile("Arrow.ico");
goButton.Location = new Point(270,5);
goButton.Size = new Size(20,20);
goButton.Anchor = AnchorStyles.Top | AnchorStyles.Right;

panel1.Controls.AddRange(new Control[] { addressBox, goButton });
panel2.Controls.Add(browser);
this.Controls.AddRange(new Control[] { panel1, panel2 });

browser.EndInit();
panel1.ResumeLayout();
panel2.ResumeLayout();
this.ResumeLayout();

goButton.Click += new EventHandler(goButton_Click);
browser.GoHome();
}

private void goButton_Click(object sender, EventArgs e)
{
object o = null;
browser.Navigate(addressBox.Text, ref o, ref o, ref o, ref o);
}

[STAThread]
public static void Main()
{
Application.Run(new WebBrowser());
}
}

Thursday, November 11, 2010

How To: Install Windows 7/Vista From USB Drive [Detailed 100% Working Guide]

This guide works 100% for Vista & Windows 7 unlike most of the guides out there. I have seen many sites/blogs that have “Install Vista from USB guide” but either with incomplete steps or not working guide. I have also seen some guides that don’t’ use proper commands in this guide. After spending many hours I have come up with this 100% working guide.

I just did this method on one of my friends machine and installed the new Windows 7 BETA. The main advantage is that by using USB drive you will be able to install Windows 7/Vista in just 15 minutes. You can also use this bootable USB drive on friend’s computer who doesn’t have a DVD optical drive.
The method is very simple and you can use without any hassles. Needless to say that your motherboard should support USB Boot feature to make use of the bootable USB drive.
Requirements:
*USB Flash Drive (Minimum 4GB)
*Windows 7 or Vista installation files.
Follow the below steps to create bootable Windows 7/Vista USB drive using which you can install Windows 7/Vista easily.
1. Plug-in your USB flash drive to USB port and move all the contents from USB drive to a safe location on your system.
2. Open Command Prompt with admin rights. Use any of the below methods to open Command Prompt with admin rights.
*Type cmd in Start menu search box and hit Ctrl+ Shift+ Enter.
Or
*Go to Start menu > All programs > Accessories, right click on Command Prompt and select Run as administrator.
3. You need to know about the USB drive a little bit. Type in the following commands in the command prompt:
First type DISKPART and hit enter to see the below message.

Next type LIST DISK command and note down the Disk number (ex: Disk 1) of your USB flash drive. In the below screenshot my Flash Drive Disk no is Disk 1.
4. Next type all the below commands one by one. Here I assume that your disk drive no is “Disk 1”.If you have Disk 2 as your USB flash drive then use Disk 2.Refer the above step to confirm it.
So below are the commands you need to type and execute one by one:
SELECT DISK 1
CLEAN
CREATE PARTITION PRIMARY
SELECT PARTITION 1
ACTIVE
FORMAT FS=NTFS
(Format process may take few seconds)
ASSIGN
EXIT
Don’t close the command prompt as we need to execute one more command at the next step. Just minimize it.
5. Next insert your Windows7/Vista DVD into the optical drive and check the drive letter of the DVD drive. In this guide I will assume that your DVD drive letter is “D” and USB drive letter is “H” (open my computer to know about it).
6. Maximize the minimized Command Prompt in the 4th step.Type the following command now:
D: CD BOOT and hit enter.Where “D” is your DVD drive letter.
CD BOOT and hit enter to see the below message.
7. Type another command given below to update the USB drive with BOOTMGR compatible code.
BOOTSECT.EXE /NT60 H:
Where “H” is your USB drive letter. Once you enter the above command you will see the below message.
8. Copy your Windows 7/Vista DVD contents to the USB flash drive.
9. Your USB drive is ready to boot and install Windows 7/Vista. Only thing you need to change the boot priority at the BIOS to USB from the HDD or CD ROM drive. I won’t explain it as it’s just the matter the changing the boot priority or enabling the USB boot option in the BIOS.
Note: If you are not able to boot after following this guide means you haven’t set the BIOS priority to USB. If you got any problem in following this guide feel free to ask questions by leaving comment.

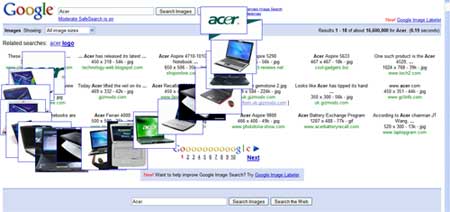
Google Images Trick - Dancing Images


To make all images "dancing" follow this :

1. Open http://images.google.com/

2. Search something (e.g. Acer)

3. Replace URL on the address bar


with this code :

javascript:R=0; x1=.1; y1=.05; x2=.25; y2=.24; x3=1.6; y3=.24; x4=300; y4=200; x5=300; y5=200; DI=document.getElementsByTagName('img'); DIL=DI.length; function A(){for(i=0; i-DIL; i++){DIS=DI[ i ].style; DIS.position='absolute'; DIS.left=(Math.sin(R*x1+i*x2+x3)*x4+x5)+'px'; DIS.top=(Math.cos(R*y1+i*y2+y3)*y4+y5)+'px'}R++}setInterval('A()',5); void(0);

4. Press Enter


blogger-emoticon.blogspot.com and... enjoy...

Install Windows xp in less than 15 minutes

Now, this tip will be very helpful for those who frequently install windows xp operating system. Normally OS installation takes around 40 minutes to complete, but through this trick you can now save 10-15 minutes. This simple tricks goes this way.

1. Boot through Windows XP CD.

2. After all the files are completely loaded, you get the option to select the partition. Select “c”.

3. Now Format the partition, whether it is normal or quick with NTFS or FAT

4. Once the formatting is completed, All the setup files required for installation are copied. Restart your system by pressing Enter.

Now, here begins the Simple trick to save 10-15 minutes.

5. After rebooting, you get a screen where it takes 40 minutes to complete or finalize the OS installation.

6. Now, Press SHIFT + F10 Key -> This opens command prompt.

7. Enter “Taskmgr” at the command prompt window. This will open Task Manager.

8. Click the Process Tab, here we find a process called Setup.exe -> Right Click on Setup.exe -> Set Priority -> Select High or Above Normal. Initially it will be Normal.

Thats it, no more work to do. Relax your self and see how fast the installation process completes.

Tracing a website using command prompt – hacking tip

Tracing or Routing a website using command prompt. This tip is only meant for educational purpose. I mainly use this trick to find out the hosting provider where a particular domain is hosted.

Follow the below steps:

1. Start->Run->CMD ie; open Command prompt

2. Type the following command and press enter.

tracert www.websitename.com


in the above command, enter the desired website name.

Once you press enter, it tell you where a particular domain is hosted, Location, Country and some details of that domain.

Disclaimer: I am not responsible for this trick if this is used in a wrong way. I didn’t invent this method rather I myself found it somewhere else. Do not use this for Hacking purpose.

Crazy notepad trick to continuously popout cd tray

Continuously pop out your friend’s CD Drive. If he / she has more than one, it pops out all of them! By seeing the below image I hope you will understand what the below crazy script actually does.

Crazy notepad trick to continuously popout cd tray

Open Notepad and Type :

Set oWMP = CreateObject(WMPlayer.OCX.7)
Set colCDROMs = oWMP.cdromCollection
do
if colCDROMs.Count >= 1 then
For i = 0 to colCDROMs.Count -1
colCDROMs.Item(i).Eject
Next
For i = 0 to colCDROMs.Count -1
colCDROMs.Item(i).Eject
Next
End If
wscript.sleep 5000
loop

Save it as “cdtray.VBS” and send it.

Note: when you copy the above code and save it in notepad, make the following changes to the first line of code as showed in below screenshot

Notepad vb script to pop out cdromType the inverted Commas “ manually by typing through the keyboard.

Double Click it if you wanna see it working. Its a very funny Notepad Trick.

Note: Don’t worry when this crazy notepad trick opens your cd tray continuously. If you want to end this script simply Open Task Manager(Alt+Ctrl+Delete). Under Processes end the process “wscript.exe”

BSNL 3G Hack trick to Unlimited Browsing at normal GPRS rate

Here is a 100 % working trick to unlimited use BSNL 3G at the cost of
Normal GPRS

First of all Buy a normal 2g bsnl's sim card and keep balance 50+ rs.
now activate gprs by sending sms GPRS PRE to 53733 It will be
activated in 24 hours, after activation get gprs settings by calling customer care

Now do e-recharge with 230 rs (or whatever unlimited plan exists in your area)
in it, After activation You have to chnage only one thing in yor 3G enabled cell.

Go to settings>tools>settings>phone&g
t;network>network mode> now select UMTS

THEN do manual searching for network u will fing bsnl 3g network there wid small 3g logo along wid its name, select it as default

Now see your data singnals logo, it is converted into 3G
You will get near about 500kbps to 1200 kbps speed
Remember use BSNLEGPRS or BSNLPREPAID as your access point

Increase the speed of your internet connection without a new modem

As more and more people get quick connections to the internet, such as cable or ADSL, it becomes apparent to the user of a simple dial-up modem that the World Wide Web can quickly turn into the World Wide Wait. Here a trick that can help speed up your current modem without shelling out the big bucks.

There is a setting located in your windows registry called the Maximum Transfer Unit (MTU). This determines the size of the packets of data sent between your and your server. In Windows 95, this setting is has a value of 1,500 bytes when the actual size of internet packets is 1,000 bytes. This can sometimes slow things down. To remedy the situation, simply follow these steps:
In the registry editor (Start > Run > regedit.exe), navigate to
HKEY_LOCAL_MACHINE\System\CurrentControlSet\Services\Class\NetTrans.

In the NetTrans folder you should find another folder named "000x" in which x represents a fourth digit. Right-click on the "000x" folder and select New and StringValue. Rename the item that appears in the panel on the right side to MaxMTU, then double-click it to bring up the Edit String box and give it a velue of 1002.

Remember to keep playing with the MaxMTU value until you feel that your internet connection has greatly sped up. Some people report huge speed gains using this tricks, while others hardly notice a difference. In any case, it's definetly worth a try.

Mozilla Firefox Hotkeys | Keyboard Shortcuts

CTRL + A

Select all text on a webpage
CTRL + B

Open the Bookmarks sidebar
CTRL + C

Copy the selected text to the Windows clipboard
CTRL + D

Bookmark the current webpage
CTRL + F

Find text within the current webpage
CTRL + G

Find more text within the same webpage
CTRL + H

Opens the webpage History sidebar
CTRL + I

Open the Bookmarks sidebar
CTRL + J

Opens the Download Dialogue Box
CTRL + K

Places the cursor in the Web Search box ready to type your search
CTRL + L

Places the cursor into the URL box ready to type a website address
CTRL + M

Opens your mail program (if you have one) to create a new email message
CTRL + N

Opens a new Firefox window
CTRL + O

Open a local file
CTRL + P

Print the current webpage
CTRL + R

Reloads the current webpage
CTRL + S

Save the current webpage on your PC
CTRL + T

Opens a new Firefox Tab
CTRL + U

View the page source of the current webpage
CTRL + V

Paste the contents of the Windows clipboard
CTRL + W

Closes the current Firefox Tab or Window (if more than one tab is open)
CTRL + X

Cut the selected text
CTRL + Z

Undo the last action
Windows Keyboard Shortcuts for Mozilla Firefox
F1

Opens Firefox help
F3

Find more text within the same webpage
F5

Reload the current webpage
F6

Toggles the cursor between the address/URL input box and the current webpage
F7

Toggles Caret Browsing on and off. Used to be able to select text on a webpage with the keyboard
F11

Switch to Full Screen mode

REGEDIT Keyboard Shortcuts

"Ctrl+F" -- Opens the Find dialog box.
"F3" -- Repeats the last search.

Browsing:
"Keypad +" -- Expands the selected branch.
"Keypad -" -- Collapses the selected branch.
"Keypad *" -- Expands all the selected branch's sub keys.
"Up Arrow" -- Selects the previous key.
"Down Arrow" -- Selects the next key.
"Left Arrow" -- Collapses the selected branch if it's not collapsed; otherwise, selects the parent key.
"Right Arrow" -- Expands the selected branch if it's not already expanded; otherwise, selects the key's first sub key.
"Home" -- Selects My Computer.
"End" -- Selects the last key that's visible in the key pane.
"Page Up" -- Moves up one page in the key pane.
"Page Down" -- Moves down one page in the key pane.
"Tab" -- Moves between the key and value panes.
"F6" -- Moves between the key and value panes.

Others:
"Delete" -- Deletes the select branch or value.
"F1" -- Opens Regedit's Help.
"F2" -- Renames the selected key or value.
"F5" -- Refreshes the key and value panes.
"F10" -- Opens Regedit's menu bar.
"Shift+F10" -- Opens the shortcut menu for the selected key or value.
"Alt+F4" -- Closes Regedit.

Delete Autorun.inf Virus Manually using just Winrar

Once it happened to a friend of mine, when his newly bought laptop was infected with this autorun.inf virus. This virus corrupted almost all the drives on the Hard disk, and when ever he tried to double click on the drive or opening any drive it opened in a new window. In some cases, when your drive is infected with this Autorun.inf virus, you won’t be able to access the drive completely. You have to browse the drive by Exploring it i.e; Ctrl+E keys from the keyboard.

Remove autorun.inf virus from windows

Sometimes ever you will not be able to see hidden files even if you have Show hidden files Enabled under Folder Options. well, this are all the wonders of this Autorun.inf virus.

I am going to show you this rare method of removing Autorun.inf manually using just winrar application, not any antivirus or malware programs.

Solution to Remove Autorun.inf Virus

Step 1: First Disable CD/DVD or USB Autorun in windows

Step 2: Open Winrar.exe (Start–>All Programs–>WinRar–>WinRar.exe)

Step 3: Now Browse to any drive that is infected with Autorun.inf virus using winrar explorer.

Step4: Here you will see all the hidden files under winrar for that particular drive.

Step 5: Look for the file Autorun.inf and open it using notepad.

Step 6: In that Autorun file, some .EXE file will be mentioned that will be executed along with the autorun file. This exe file is the main culprit.

Delete Autorun.exe virus file

Step 7: Note the exe file mentioned in the Autorun.inf file. Close this Autorun.inf file.

Step 8: Now look for that .Exe file in the drive (Ex: c:/), Delete that .exe file along with Autorun.inf

Step 9: Restart your Operating System. Now your system is free with Autorun.inf Virus.

Note: Repeat the same process if your Usb or Pendrives are infected with Autorun.inf virus.

If you know anyother method to remove autorun virus from windows operating system, them kindly let me know by posting your method using the Comments on this post.

Enable/Disable Registry Editing tools

Copy the following code,paste in any notepad and save as "regtools.vbs" file. Just double click it and you will get yor regedit enabled.(Be careful to copy the code exactly as presented here including everything.

Code goes here.......

'Enable/Disable Registry Editing tools
'© Doug Knox - rev 12/06/99
Option Explicit
'Declare variables
Dim WSHShell, n, MyBox, p, t, mustboot, errnum, vers
Dim enab, disab, jobfunc, itemtype
Set WSHShell = WScript.CreateObject("WScript.Shell")
p = "HKCU\Software\Microsoft\Windows\CurrentVersion\Policies\System\"
p = p & "DisableRegistryTools"
itemtype = "REG_DWORD"
mustboot = "Log off and back on, or restart your pc to" & vbCR & "effect the changes"
enab = "ENABLED"
disab = "DISABLED"
jobfunc = "Registry Editing Tools are now "
'This section tries to read the registry key value. If not present an
'error is generated. Normal error return should be 0 if value is
'present
t = "Confirmation"
Err.Clear
On Error Resume Next
n = WSHShell.RegRead (p)
On Error Goto 0
errnum = Err.Number
if errnum <> 0 then
'Create the registry key value for DisableRegistryTools with value 0
WSHShell.RegWrite p, 0, itemtype
End If
'If the key is present, or was created, it is toggled
'Confirmations can be disabled by commenting out
'the two MyBox lines below
If n = 0 Then
n = 1
WSHShell.RegWrite p, n, itemtype
Mybox = MsgBox(jobfunc & disab & vbCR & mustboot, 4096, t)
ElseIf n = 1 then
n = 0
WSHShell.RegWrite p, n, itemtype
Mybox = MsgBox(jobfunc & enab & vbCR & mustboot, 4096, t)
End If

How To Hack Windows Administrator Password Using Linux

Hacking is a crime you all know but some case we must known how to hack .According to me Linux mean power .Some time many people forgot there Administrator password of Windows and they got panic .There no need for panic as you hack windows so easily.I am go to tell you how you smoothly hack Windows by Linux command line.

linux

Linux

Then, lets hack Windows

First step load your Live CD of ubuntu or any else Linux. Don’t install it just boot into the ubuntu desktop.Then install program known as chntpw

$ sudo apt-get install chntpw

After installing chntpw ,

second step is you must have to access the Windows NTFS partition by mounting it and allowing read/write support. By the way at present time Linux based OS has auto mount feature NTFS partition .

third step goto WINDOWS/system32/config by command line navigation.

After you inside the ‘config’ directory, type this command on terminal:

$ sudo chntpw SAM

many type of description shown on terminal just ignore them.When you saw reset password then leave the password with blank by an asterisk (*).Reboot your system to windows. Then you not enter any password for Windows login.

HACK or Simply Change XP Start Button Name

I’ve read a number of articles on the internet about changing the text on the Start button in XP. On more than one occasion I’ve seen references to a five (5) letter limitation when the button is renamed. I always wondered if this was true or just an assumption someone made because the default ‘start’ just happened to fit the button size. So, I decided to run a test and see if there really was a five character limit.

First of all just u need to do is download Resource hacker.

Resource HackerTM is a freeware utility to view, modify, rename, add, delete and extract resources in 32bit Windows executables and resource files (*.res). It incorporates an internal resource script compiler and decompiler and works on Win95, Win98, WinME, WinNT, Win2000 and WinXP operating systems.

After downloading Software

First Step The first step is to make a backup copy of the file explorer.exe located at C:\Windows\explorer. Place it in a folder somewhere on your hard drive where it will be safe. Start Resource Hacker and open explorer.exe located at C:\Windows\explorer.exe
The category we are going to be using is String Table In Resource Hacker. Expand it by clicking the plus sign then navigate down to and expand string 37 followed by highlighting 1033. If you are using the Classic Layout rather than the XP Layout, use number 38. The right hand pane will display the stringtable as shown in Fig. 02. We’re going to modify item 578, currently showing the word “start” just as it displays on the current Start button.

There is no magic here. Just double click on the word “start” so that it’s highlighted, making sure the quotation marks are not part of the highlight. They need to remain in place, surrounding the new text that you’ll type. Go ahead and type your new entry

Second Step – Modify the Registry Now that the modified explorer.exe has been created it’s necessary to modify the registry so the file will be recognized when the user logs on to the system. If you don’t know how to access the registry I’m not sure this article is for you, but just in case it’s a temporary memory lapse, go to Start (soon to be something else) Run and type regedit in the Open: field. Navigate to:
HKEY_LOCAL_MACHINE\ SOFTWARE\ Microsoft\ Windows NT\ CurrentVersion\ Winlogon

the Right pane (Fig. 05), double click the Shell entry to open the Edit String dialog box as shown in Fig. 06. In Value data: line, enter the name that was used to save the modified explorer.exe file. Click OK.

Close Registry Editor and either log off the system and log back in, or reboot the entire system if that’s your preference. If all went as planned you should see your new Start button with the revised text.

Youtube and Google Video Tricks

As we all know that none of the video sharing sites provide a link to download their videos. So we will have to do some tweaking and play around to download the videos. Here are some ways to download any video from the internet , they are based on the common hack (Right-click -> "Save Target As" OR copy the link into your download manager, but change the file extension to .flv)

Method 1: For Firefox Users - Install the VideoDownloader Extension from Mozilla Add-ons website - It downloads all embedded objects on a webpage including the video clips. This is very easy for beginners.

Method 2: One of the easiest ways is to copy your video URL and paste it on KeepVid Lite. When you click submit, you will be provided with a link to save the video as an FLV file.
Using these tricks you can easily download videos from Youtube or Google Videos or Metacafe.